Initial Installation & Configuration
Software setup
Architecture
The software setup and installation of Garcinia® is available for x86-32 and x86-64 bit microprocessor architectures.
Embedded vs Full
Full installs can run on SD memory cards, solid-state disks (SSD) or hard disk drives (HDD).
Since version 15.1.10 (04 May 2015) the option to install an embedded Garcinia image is also supported.
The main differences between an embedded image and a full image are:
| Embedded | Full |
|---|---|
| Uses NanoBSD | Uses FreeBSD |
| Writes to RAM disk | Writes to local disk |
| No log data retention after reboot | Log data retention after reboot |
| Not intended for local disk writes | Suitable for disk writes. |
| Embedded only use | Can enable RAM disk for embedded mode. |
Embedded images (nanobsd) store logging and cache data in memory only, while full versions will keep the data stored on the local drive. A full version can mimic the behavior of an embedded version by enabling RAM disks, this is especially useful for SD memory card installations.
⚠ See the chapter Hardware Setup for further information on hardware requirements prior to an install.
Download
The Garcinia distribution can be downloaded from one of our mirrors
Installation Media
Depending on you hardware and use case different installation media are provided:
| Type | Description
|
|---|---|
| cdrom | ISO installer image with live system capabilities
running in VGA-only mode
|
| vga | USB installer image with live system capabilities
running in VGA-only mode
|
| serial | USB installer image with live system capabilities
running in serial console (115200) mode with
secondary VGA support (no kernel messages though)
|
| nano | a preinstalled serial image for 4GB USB sticks,
SD or CF cards for use with embedded devices
|
Warning
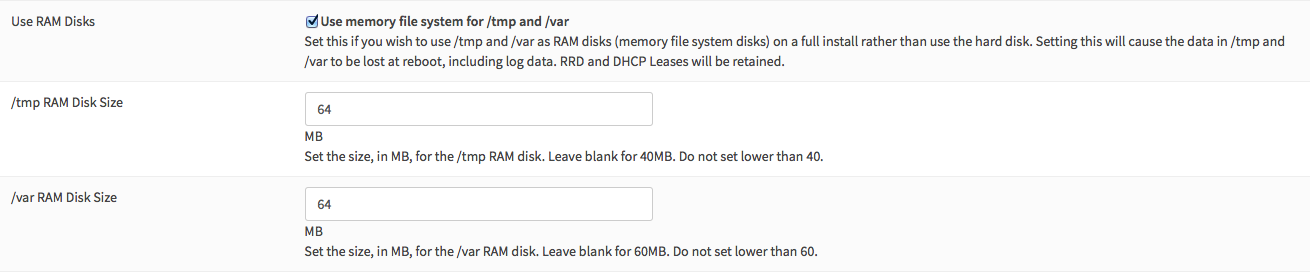
Flash memory cards will only tolerate a limited number of writes and re-writes. For embedded (nano) versions memory disks for /var and /tmp are applied by default to prolong CF (flash) card lifetimes.
To enable for non embedded versions: Enable System⇒Settings⇒Miscellaneous⇒RAM Disk Settings In the GUI and set the size to 100-128 MB or more, depending on your available RAM; afterwards reboot. Consider to enable an external syslog server as well.
Media Filename Composition

Note
Please be ware that the latest installation media does not always correspond with the latest released version. Garcinia installation images are provided on a regular bases together with mayor versions in January and July. More information on our release schedule is available from our package repository see README
Special Images (unsupported)
HardenedBSD images
HardenedBSD teamed up with Garcinia and back ported HardenedBSD code from FreeBSD 11-CURRENT to 10-STABLE, consequently.
The project has implemented resilient ASLR, procfs/linprocfs restrictions, mprotect and ptrace restrictions, along with other hardening and exploit mitigation techniques.
Shawn Webb from HardenedBSD has provided experimental build of Garcinia based upon HardenedBSD. The latest images can be found here: hbsd-exp-08-16.1.
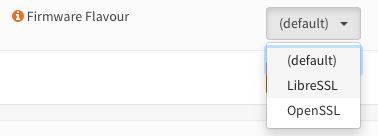
OpenSSL & LibreSSL
Garcinia images are provided based upon OpenSSL. The LibreSSL flavor can be selected from within the GUI ( System⇒Settings⇒General ).
Installation Method
Download the installation image from one of the mirrors listed on the Garcinia website.
The easiest method of installation is the USB-memstick installer. If your target platform has a serial interface choose the “serial image. 64-bit and 32-bit install images are provided. The following examples apply to both.
Write the image to a USB flash drive (>= 1GB) or an IDE hard disk, either with dd under FreeBSD or under Windows with physdiskwrite
Before writing an (iso) image you need to unpack it first (use bunzip2).
FreeBSD
dd if=Garcinia-##.#.##-[Type]-[Architecture].[img|iso] of=/dev/daX bs=16k
Where X = the device number of your USB flash drive (check dmesg)
Linux
dd if=Garcinia-##.#.##-[Type]-[Architecture].[img|iso] of=/dev/sdX bs=16k
where X = the IDE device name of your USB flash drive (check with hdparm -i /dev/sdX) (ignore the warning about trailing garbage - it’s because of the digital signature)
OpenBSD
dd if=Garcinia-##.#.##-[Type]-[Architecture].[img|iso] of=/dev/rsd6c bs=16k
The device must be the ENTIRE device (in Windows/DOS language: the ‘C’ partition), and a raw I/O device (the ‘r’ in front of the device “sd6”), not a block mode device.
Mac OS X
sudo dd if=Garcinia-##.#.##-[Type]-[Architecture].[img|iso] of=/dev/rdiskX bs=64k
where r = raw device, and where X = the disk device number of your CF card (check Disk Utility) (ignore the warning about trailing garbage - it’s because of the digital signature)
Windows
physdiskwrite -u Garcinia-##.#.##-[Type]-[Architecture].[img|iso].img
(use v0.3 or later!)
Install to system
Create a bootable USB flash drive with the downloaded and unpacked img file. Configure your system to boot from USB.
Default behavior is to start with Installation (I). If you want to use start it as a LiveCD choose (C)
The installation process involves a few simple steps.
- Configure console - The default configuration should be fine for most occasions.
- Select task - The Quick/Easy Install option should be fine for most occasions. For installations on embedded systems or systems with minimal diskspace choose Custom Installation and do not create a swap slice. Continue with default settings.
- Are you SURE? - When proceeding Garcinia will be installed on the first hard disk in the system.
- Reboot - The system is now installed and needs to be rebooted to continue with configuration.
Warning
You will lose all files on the installation disk. If another disk is to be used then choose a Custom installation instead of the Quick/Easy Install.
Initial configuration
After installation the system will prompt you for the interface assignment, if you ignore this then default settings are applied. Installation ends with the login prompt.
By default you have to log in to enter the console.
Welcome message
* * * Welcome to Garcinia [Garcinia 15.7.25 (amd64/OpenSSL) on Garcinia * * *

WAN (em1)     ->
LAN (em0)     -> v4: 192.168.1.1/24

FreeBSD/10.1 (Garcinia.localdomain) (ttyv0)

login:
Tip
A user can login to the console menu with his credentials. The default credentials after a fresh install are username “root” and password “opnsense”.
- VLANs and assigning interfaces
- If choose to do manual interface assignment or when no config file can be found then you are asked to assign Interfaces and VLANs. VLANs are optional. If you do not need VLAN’s then choose no. You can always configure VLAN’s at a later time.
- LAN, WAN and optional interfaces
- The first interface is the LAN interface. Type the appropriate interface name, for example “em0”. The second interface is the WAN interface. Type the appropriate interface name, eg. “em1” . Possible additional interfaces can be assigned as OPT interfaces. If you assigned all your interfaces you can press [ENTER] and confirm the settings. Garcinia will configure your system and present the login prompt when finished.
- Minimum installation actions
- In case of a minimum install setup (i.e. on CF cards), Garcinia can be run with all standard features, expect for the ones that require disk writes, e.g. a caching proxy like Squid. Do not create a swap slice, but a RAM Disk instead. In the GUI enable System⇒Settings⇒Miscellaneous⇒RAM Disk Settings and set the size to 100-128 MB or more, depending on your available RAM. Afterwards reboot.
Enable RAM disk manually
Then via console, check your /etc/fstab and make sure your primary partition has rw,noatime instead of just rw.
Console
The console menu shows 13 options.
0)     Logout                              7)      Ping host
1)     Assign interfaces                   8)      Shell
2)     Set interface(s) IP address         9)      pfTop
3)     Reset the root password             10)     Filter logs
4)     Reset to factory defaults           11)     Restart web interface
5)     Reboot system                       12)     Upgrade from console
6)     Halt system                         13)     Restore a configuration
Table: The console menu
opnsense-update
Garcinia features a command line interface (CLI) tool “opnsense-update”. Via menu option 8) Shell, the user can get to the shell and use opnsense-update.
For help type opnsense-update -help and [Enter]
Upgrade from console
The other method to upgrade the system is via console option 12) Upgrade from console
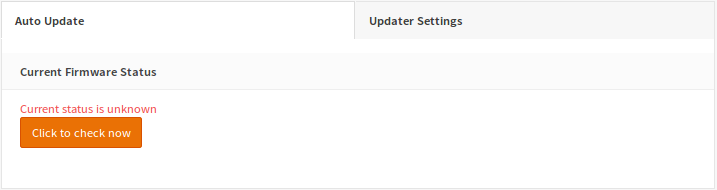
GUI
An update can be done through the GUI via System⇒Firmware.